How Can We Help?
Ortelia Space Builder – The Interface
Getting Started
Image to go here
Ortelia Space Builder is installed with Ortelia Curator™.
To start Ortelia Space Builder™ go to the Windows start menu and navigate to the Ortelia Curator menu. Click on the Ortelia Space Builder link with your Left Mouse Button (LMB).
Note: Load time will depend on the hardware configuration you are using. Refer to our recommended hardware configuration above.
The Space Builder Interface
There are three key areas within the environment. These are:
- – The File Menus
- – The Build Panel
- – The Build Work Space

The Ortelia Space Builder Interface
The File Menus
The ‘File’ menu consists of four menu items with each menu having its own drop-down. The menu items and their drop-downs are detailed below.
The ‘File‘ menu gives users access to commonly used commands.
| New | Create a new space |
| Open | Open an existing space file |
| Save | Save the current space |
| Save As | Save the current space with a new name |
| Screenshot | Save a screenshot of the current view |
| Exit | Exit Ortelia Space Builder |
The ‘Edit‘ menu allows users to undo and redo actions.
| Undo (Ctrl + z) | Undo the last actions |
| Redo (Ctrl + y) | Redo the undo sequence |
The ‘View‘ menu allows users to switch between ‘Plan View’ and ‘Preview’.
| Plan View (Ctrl + p) | Switch to ‘Plan’ view when in preview mode (3D view) |
| Preview (Ctrl + p) | Switch to ‘Preview’ view (3D view) when in plan view mode |
The ‘Help‘ menu gives access to this help manual and information about the software.
| Quick Start Guide | Launches the Quick Start Guide with descriptions of commonly used tools |
| User Manual | Opens a web browser to view the online manual |
| Web | Go to the Ortelia website |
| About | Application credits and version number |
The Build work panel in detail
The ‘Build’ work panel is divided into four individual tabs that allow access to categorised functionality. The work panel tabs are summarised below:
| External Shape | Tools for creating the external walls of individual gallery spaces, setting ceiling height and apply floor coverings |
| Walls | Tools for building internal walls |
| Inserts | Tools for creating doorways, windows and hole inserts in walls |
| Tools | Tools for importing floor plans, setting drawing scale and setting gallery real-world position |
The External Shape Tab
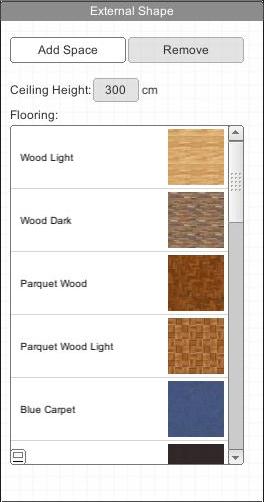 |
Add Space | Create a new space or add another to the current build |
| Remove | Remove the selected space | |
| Ceiling Height | Set the ceiling height for the currently selected space | |
| Flooring | Change the floor covering for the selected space from the preset list. |
The Walls Tab
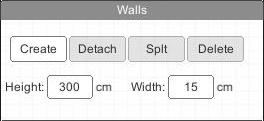 |
Create | Create an internal wall |
| Detach | Detach a section of wall | |
| Split | Split a wall into two equal sections | |
| Delete | Delete the selected wall | |
| Height | Set the wall height | |
| Width | Set the wall thickness |
The Tools Tab
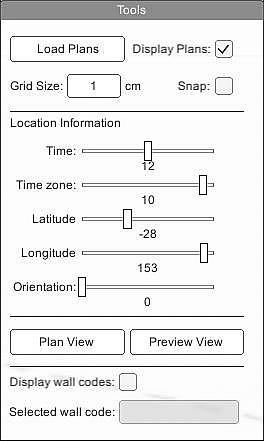 |
Load Plans | Create an internal wall |
| Display Plans | Show or hide the plan in the Build area | |
| Grid Size | Set the size of the grid squares and snapping | |
| Snap | Turn snapping o/off when creating walls, placing inserts etc. | |
| Location Information | Enter the time zone, latitude, longitude, and orientation (north) of your gallery | |
| Plan View | Switch to Plan View from Preview View (3D mode) | |
| Preview View | Switch to Preview view (3D mode) from Plan View | |
| Display Wall Codes | Show or hide the wall codes | |
| Selected Wall Code | Shows the code of the currently selected wall |
The Inserts Tab
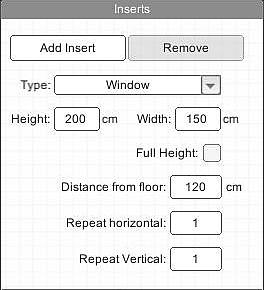 |
Add Insert | Add an insert in a wall |
| Remove | Remove the selected insert from a wall | |
| Type | Select between, Window, Doorway, Hole or Fixed Door (Closed door) using the drop-down menu | |
| Width | Set the width of the insert | |
| Height | Set Height of the insert | |
| Full Height | Checkbox for full floor to ceiling insert | |
| Distance From Floor | Distance of the base of the insert from the floor | |
| Repeat Horizontal | Input the number of horizontal sections in the insert | |
| Repeat Vertical | Input the number of vertical sections in the insert |